Thursday, April 22, 2010

Day 19- The PROJECT

Well, let's just say I have been feeling adventurous...(obviously). I bought a power tool combo pack and you have got to try everything out right? So this past weekend with all of the brilliant ideas going around I decided to try and add to the brilliantness. Last week I thought of a laundry chute option which would drop directly from the kids bathroom to the top of my washing machine...brilliant right? Because if I made it easy..maybe I would actually do the laundry??
There use to be a tall linen cabinet in the corner of the 2nd floor bath which was cool, I was going to keep it and paint it but once everything got gutted the bathroom looked so much bigger without it. But then I realized that the bottom of the cabinet had a laundry hamper in it which I thought was the coolest thing ever and was trying to figure out how to use it. So I went upstairs and measured and realized that I could fit the bottom half of the cabinet into the bathroom wall and with a little retro-fitting of the hamper depth (by my dad- thanks dad!) it could all magically work. Now I just needed to figure out how to get some linen storage in. So I came up with an open towel shelf. I think it would be fun to have bright and colorful towels on display that are also easily accessible and some extra toiletries stored in fun bins would fit too. So I started cutting my shelf this past weekend. Let me just first start to explain that this is really the first time I have used a circular saw to any extent. I mean I have helped cut deck boards and misc trim or whatever for our old house but to actually take a big 4x8 sheet of nice wood and build something...never happened. So hey why not give it a try right? It can't be that hard!
Ummmmm...yeah.
Let's just say I cut some wood this weekend but put off the rest until my dad could help me. Not that my dad wants to take any credit in the final product though since it is not straight and there are numerous gaps from crooked cuts...but I still think it is pretty cool. And will look great with a little putty, some trim and a few coats of paint! lol
The shelf will be mounted to the left as shown and the cabinet on the right is the one being retrofitted into the framing behind it and the chute opening is below (which I got to use my sawz all for!). What do you think?

Day 18- Bucketload of Crap

So Monday I took a friend to the doctor and took a little sister out for her birthday and that seriously took up my entire day (but a day off from dirt is usually nice)...so needless to say I made one short stop at my house where I noticed my 4TH DUMPSTER was getting kinda full. I did not budget for 4 dumpsters ($700). The first dumpster was included in my roof cost...the others have been so full when they were picked up that we got yelled at by the dumpster guy.
This 4th dumpster was actually suppose to be a 10yarder but they brought the wrong size so the guy told me not to fill it up all the way or I would be charged for a 20 yarder...not sure I can avoid it really. We are close, but it is time for another cleaning and one more plaster wall section that needs to come down. Hmmmm.

Day 17- Brilliant Ideas

So the great thing about working with great people is that together you can come up with brilliant ideas. I think sometimes you stare at something too long and you don't think past what you already had planned.
Once the walls were opened up completely and everything was actually clean I was talking with my contractor about what to do in Lucas' room because there was not actually a closet in his room. There was one right outside it, but I had always planned on putting a small closet behind his door because the space wasn't very useful, but my contractor said- "Why don't you just recess it into the wall?" Oh...well now that is brilliant since there is just wasted attic space. Problem being it was going to be short with the roof angle which probably wouldn't have been a big deal. But then we got thinking- why don't we take the hall closet and make an opening to it off of his room. There was just enough space for a 24" door to go into a "walk-in" closet that we extended about 3' into the attic space. So it got framed out that night! The shorter side is unusable for hanging clothes probably but it is perfect for rubbermaid tubs of old/future clothes. And I have a feeling that Lucas will turn this room into a pretty cool hang out while he is little.
Then in Lilly's room there was a closet already in place, but it had two large ducts (supply and return) running through the closet from the basement. These were added on when the upstairs was finished (guessing about the 50's based on finishes). My contractor asked why I didn't just change these ducts to flex ducts and run them through the attic instead? Again...brilliant.
So that is what we did! You can kind of see them in the picture below inside the closet, and then a 6" duct use to run all the way up to the vent you see at the top.
Here are the new flex ducts back behind the closet.
Now I just need to fix the hole in the floor!

Day 16- Getting Dirty

Well the fun part of demolition is the tear down, breaking walls, using sledge hammers etc. But cleaning up always follows and it seems to take just as long...if not longer. Especially when you are tearing down plaster walls that just crumble and turn to dust. So needless to say it is boring to blog about cleaning up but basically half of the time at the house that is what I am doing. I always say I will be sick of cleaning this house before I even move into it...but what I am hoping is that when it is actually clean and livable I will just want to keep it that way all the time.

The whole house is a dusty mess and I have not been able to work upstairs without a mask on since we opened up the walls. The amount of dust and insulation and 80 years worth of crap is just floating through the air and if you are not wearing a mask you will be blowing black snot later that day (just being honest).
So, this past weekend I cleaned and also finished cleaning out all of the attic bays. Once I had decided to tear off the paneling and realized the other boards were behind it and the nasty insulation that was behind that I decided that $500 was worth paying someone else to do it. And it was a good thing I did for the following reasons:
1. It would have taken me a four days to do by myself
2. It was very hot up there and you could hardly breathe even with a mask
3. The brown mexican that went in came out black...seriously

Even this past weekend when I was just cleaning up final insulation residue my arms and face were charcoal in color and my mask was covered in dust. This is what it looked like when the walls were opened up:
This is what it looked like after I paid the guy to dig it all out:
And then I essentially this past weekend I shop vac'd all the little leftover insulation debris, ashphalt shingle debris (that had come through the rooff during tear-off) and 80 year old dust. It was not fun, but felt so good to see this at the end:

And now we are ready for new insulation!

Monday, April 19, 2010

Renovation Day 15- Now we are getting somewhere!

Ok, so we had been slowly framing all week but Friday they hit it hard and it all came together. I have sketched out over the original spaceplan to show you the changes I am making. The side door on the left goes away and I am putting in a back door and new "mud hallway" complete with washer/dryer and coat storage. The kitchen gets about 24" longer but I gain alot of cabinetry. I am then taking what is now the 4th bedroom and making it a small office with built-in bookcase. (I am super excited about this room).
The second floor plan seen just above already had a dormer built out in back for a 3/4 bath which was gutted as seen before. We are expanding the closet and putting the door off the bedroom to the left instead of the hallway. The attic dormer in front gets insulated and finished for a toy room.
This side door gets removed and filled in and it will look something like what I have sketched below: The existing stud wall got removed and a header put in place for support and all the walls were framed! The kitchen wall sits back another 24" but with closing up the side door I gain about 8' of lineal cabinetry. The picture below is where my new back door will go as well as coats and washer/dryer niche.
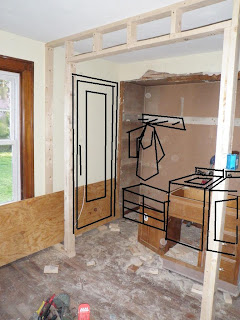
What you are looking through in the picture above is the new pocket door opening to my office!
And this is just a quick sketch of the new tub and open linen storage in the 1st floor bathroom.

Renovation Day 14- Final Demo

So after the waterfall we decided to rip out the plaster sticks and insulation that was between the two bathrooms...so the carefulness thatwe had taken with taking off the ceiling or my dad taking out each nail the week before was pointless...but really not very much damage for what could have been much worse. The plaster on the walls also needed to come off so the plumber could get access. So here is what it looked like in the morning...
Here is after we ripped out the ceiling exposing the pipes above...
And here are the walls after we tore off the plaster. There was a foot of plaster and sticks on the floor before we cleaned up. Can you imagine building a house with all of those sticks?? Wow.
We also finished demo of the 2nd floor. Things were really starting to open up. The picture below shows the new toy room. I have opened up the attic dorner of the house and will put in a small half-circle window instead of the vent which I sketched below:

Standing at the top of the stairs looking into Lilly's room.

Renovation Day 13- A 3 story Waterfall

Ok, so as I had mentioned before I was having water leaking issues. Essentially my water valve that shuts off the water to the house does not close all the way and even though this valve is on Indianapolis Waters side of the meter it is my responsibility (of course!). So essentially something always wants to leak because of the flow. I had turned on the outside spicket but there was still a constant little flow so I turned it off thinking it would be fine....N.O. no. I got there Wednesday morning and the 2nd floor bathroom which had already been gutted leaked water out of the sink valves all night which meant that when I walked in and heard dripping I went to the bathroom on the first floor to find something that looked like this:
(I have tried to simulate water dripping from the floor above...but at least it wasn't really black). It was a mess and had started to leak out onto my hardwood floor in the hallway and down into the basement through the old shower location. It also ruined the subfloor in the upstairs bathroom (which was questionable anyway). It could have been alot worse. I only stopped by quickly to unlock the house for a sub contractor or else it would have been another 3 hours before I had gotten there.
So needless to say, I called IW and had them turn the water off at the street until we are done with plumbing...and didn't accomplish much else this day...except for finding another hidden gem:
It is actually more fun than the old sign one that was on top of it and honestly if it was in good shape I would have left it just because it is soooo vintage.

Renovation Day 12- Next Phase- at least downstairs

So by Tuesday we had moved on from demolition to renovation- at least on the first level. The outside hole had been repaired and filled in. The wall got double framed in order to get new HVAC ducts up to the new finished attic dormer which will be the toy room.
Ready for drywall.
Rot gone and you can see the hardwood floor underneath the black goo I need to scrape off.
So this is a picture of the orginal dining room. Not sure when the paneling was added...but the wallpaper and ceramic tile were fairly recent (and ugly). The fan light has pictures of barns on it...its up for donation if anyone wants it. Big improvement already if you ask me.